Customize an Azure AD B2C policy using HTML and JavaScript
- Last updated on
- 19 Jul 2024
- tags
User flows and custom policies allow you to determine how your customers interact with your app when they sign up, sign in, reset password and update profile. User flows are easy to set up and recommended for most users. However they limit UI customization options to only adding a brand logo, changing page background and choosing one among three layout templates. If you wan't more you'll have to reach for custom policies.
In this article I will show you how to alter the look and behaviour of a custom policy to fit your needs. I'll be customizing a password-less policy I made.
Why customize
Login and sign up pages are among the first pages your new customers interact with, it's important that you make them frictionless.

Looking at current journey sign in journey, there are things that bother me:
- The user has to click too many buttons during sign in
- All the button in the journey have a primary look and can confuse a user.
- It's inconvenient to ask the user to "send a verification" code.
- I need to make the text on buttons, errors, headers and messages align to the sign in journey.
- The error are are awkwardly positioned.
- I want to provide a terms of service agreement from outside the custom policy to keep the number of clicks needed down.
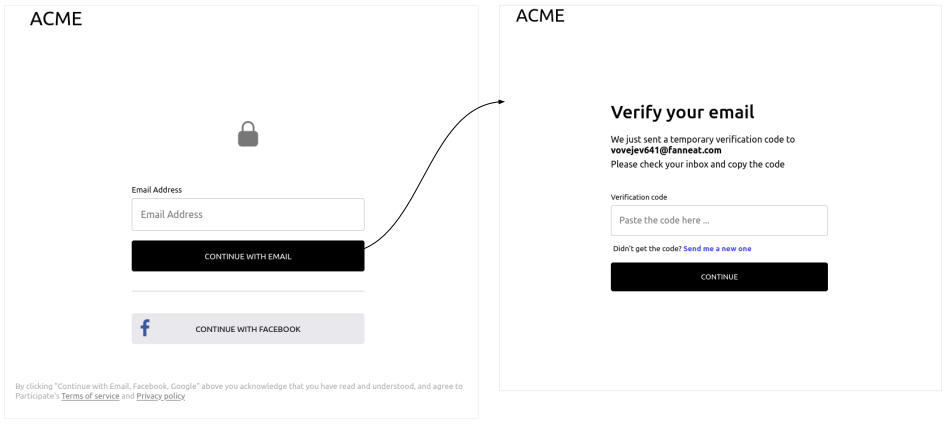
By the end of this article we should have something close to this.
Prerequisites
- Visual Studio Code
- Azure AD B2C extension for VS code
- Node.js (optional)
- Git (optional)
Setup
To begin, download the sample policy from this GitHub repository and switch to the unstyled branch. Then, follow the readme instructions add it to your Azure AD B2C tenant.
git clone git@github.com:vinmugambi/azure-b2c-custom-html.git
cd azure-b2c-custom-html
git checkout unstyled
Open the folder in Vs code
code .
Create html files and link them to your policy
Create a html/shared.css file and copy this into it.
* {
  box-sizing: border-box;
  font-family: system-ui, -apple-system, BlinkMacSystemFont, "Segoe UI", Roboto,
    Oxygen, Ubuntu, Cantarell, "Open Sans", "Helvetica Neue", sans-serif;
}

h2 {
  font-size: 2rem;
  margin: 0.2rem 0;
  font-weight: 500;
}

.wide {
  max-width: 800px;
  min-width: 320px;
  width: 100%;
}

.slim {
  width: 100%;
  min-height: 4rem;
  max-width: 24rem;
  min-width: 320px;
}

.centered {
  margin-left: auto;
  margin-right: auto;
}

.text-muted {
  color: #666;
  font-size: small;
}

.text-muted a {
  color: #444;
}

figure#logo {
  margin: 1rem;
  font-size: 2rem;
}

main {
  display: flex;
  min-height: 70vh;
  justify-content: center;
  align-items: center;
  flex-direction: column;
}
Create a html/signuporsignin.html file with the following contents.
<!DOCTYPE html>
<html lang="en">
  <head>
    <meta charset="UTF-8" />
    <meta http-equiv="X-UA-Compatible" content="IE=edge" />
    <meta name="viewport" content="width=device-width, initial-scale=1.0" />
    <title>Acme</title>
    <link rel="stylesheet" href="./shared.css" />
  </head>
  <body>
    <header>
      <nav class="wide centered">
        <figure id="logo">ACME</figure>
      </nav>
    </header>

    <!-- Azure AD B2C will insert its html here, anything you put inside this div
   will be overridden -->
    <main>
      <svg
        xmlns="http://www.w3.org/2000/svg"
        viewBox="0 0 24 24"
        fill="#777"
        style="height: 3rem; width: 3rem; display: block; margin-bottom: 2rem;"
      >
        <path
          fill-rule="evenodd"
          d="M12 1.5a5.25 5.25 0 00-5.25 5.25v3a3 3 0 00-3 3v6.75a3 3 0 003 3h10.5a3 3 0 003-3v-6.75a3 3 0 00-3-3v-3c0-2.9-2.35-5.25-5.25-5.25zm3.75 8.25v-3a3.75 3.75 0 10-7.5 0v3h7.5z"
          clip-rule="evenodd"
        />
      </svg>

      <div id="api" class="slim">
        Azure AD B2C will insert its html here, anything you put inside this div
        will be overridden by azure content.
      </div>

      <section class="wide">
        <p class="text-muted" style="margin: 3rem 1rem">
          By clicking "Continue with Email, Facebook" above you acknowledge that
          you have read and understood, and agree to Participate's
          <a href="#">Terms of service</a> and
          <a href="#">Privacy policy</a>
        </p>
      </section>
    </main>
  </body>
</html>
Create a html/selfasserted.html and paste this into it
<!DOCTYPE html>
<html lang="en">
  <head>
    <meta charset="UTF-8" />
    <meta http-equiv="X-UA-Compatible" content="IE=edge" />
    <meta name="viewport" content="width=device-width, initial-scale=1.0" />
    <title>Acme</title>
    <link rel="stylesheet" href="./shared.css" />
  </head>
  <body>
    <header>
      <nav class="wide centered">
        <figure id="logo">ACME</figure>
      </nav>
    </header>

    <main>
      <div class="slim">
        <h2 style="font-size: 2rem; margin: .2rem 0">Verify your email</h2>
        <p style="margin-bottom: 2rem" id="instruction">
          we have sent an email to you
        </p>
        <p style="margin-top: 0.4rem">
          Please check your inbox and copy the code
        </p>
      </div>

      <div id="api" class="slim">
        Azure AD B2C will insert its html here, anything you put inside this div
        will be overridden by azure content.
      </div>
    </main>
  </body>
</html>
Host the files in a publicly available domain and enable cors
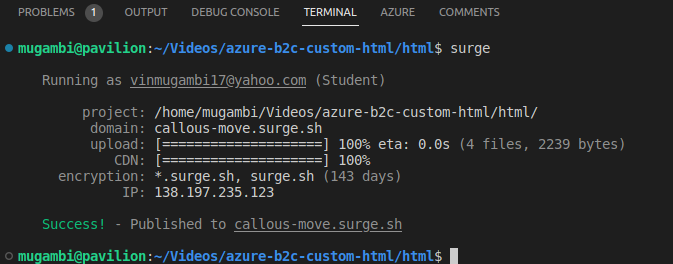
I'll be using Surge.sh for its simplicity. However you can use your preferred static hosting solution.
Open the terminal, make sure you are in the folder that contains your project. Install surge globally
npm install -g surge
Navigate to the folder that contains your html files and create a CORS file
cd html && echo "*" > CORS
Run surge to initiate deployment. Surge will ask you to answer a few prompts before making the deployment.
surge
The surge command will respond get the public url of your hosted files.
Change the css links to the path of you hosted css in both html/signuporsignin.html and html/selfasserted.html
  <title>Acme</title>
- <link rel="stylesheet" href="./shared.css" />
+ <link rel="stylesheet" href="https://callous-move.surge.sh/shared.css" />
deploy your changes to surge.
echo callous-move.surge.sh > CNAME && surge
The CNAME file helps surge remember your public domain each time you deploy changes.
Configure your policy to use the hosted html files
Copy the public urls of your hosted html into appsettings.json.
 {
   "PoliciesFolder": "",
   "EnvironmentsFolder": "dist",
   "Environments": [
     {
       "Name": "Development",
       "Production": false,
       "Tenant": "your-b2c-tenant",
       "PolicySettings": {
         "IdentityExperienceFrameworkAppId": "4ca6fc17-f6f5-4d91",
         "ProxyIdentityExperienceFrameworkAppId": "de823b09-5e3b-46a4",
         "FacebookAppId": "8180550952015656",
-        "signInTemplateUrl": "~/tenant/templates/AzureBlue/unified.cshtml",
-        "verifyTemplateUrl": "~/tenant/templates/AzureBlue/selfAsserted.cshtml"
+        "signInTemplateUrl": "https://callous-move.surge.sh/signuporsignin.html",
+        "verifyTemplateUrl": "https://callous-move.surge.sh/selfasserted.html"
       }
     }
   ]
 }
Now, generate the policy files based on appsettings.json. To do this, click ctrl+shift+p to open VS code command pallet. Search for "B2C build all policies" and click it.
Upload the generated files, located in dist/Development, to AD B2C tenant using the azure portal and run the it. It will be labelled as B2C_1A_NO_PASSWORD
Your should get something close to this
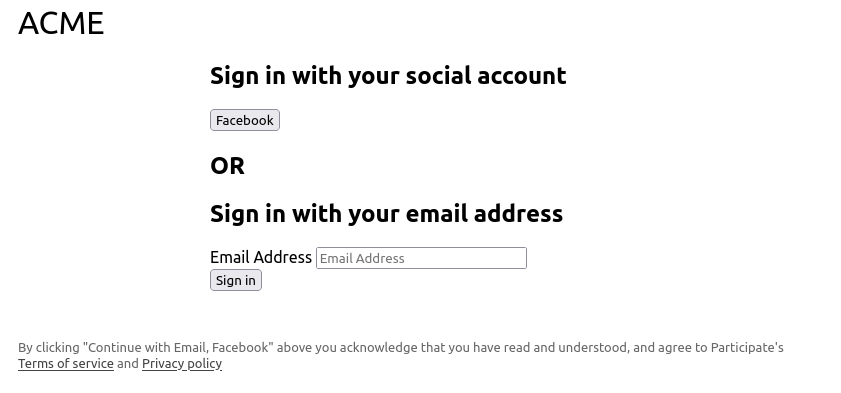
Let's pause for a moment and discuss what happened. Azure AD B2C will merge its own html with your custom html. It checks for the block element with the id of "api" and inserts the journey specific markup there to replace anything you put there. This gives you control of any markup outside the api element, it's position and look.
<ContentDefinition Id="api.signuporsignin">
  <LoadUri>https://callous-move.surge.sh/signuporsignin.html</LoadUri>
  <RecoveryUri>~/common/default_page_error.html</RecoveryUri>
  <DataUri>urn:com:microsoft:aad:b2c:elements:contract:unifiedssp:2.1.5</DataUri>
  <Metadata>
    <Item Key="DisplayName">Signin and Signup</Item>
    </Metadata>
</ContentDefinition>
It's important that you understand tis two properties of your content definition
- The
LoadUriof a content definition signals to Azure AD B2C what page template to use. - The
DataUridetermines the structure of the inputs configured on your UITechnicalProfile
Setup local development
We don't want test your login pages from the Azure portal each time we make a change. It's better we test them locally and upload them for testing when we think we're done.
To do this, go the browser developer tools and copy everything inside the <div id="api">
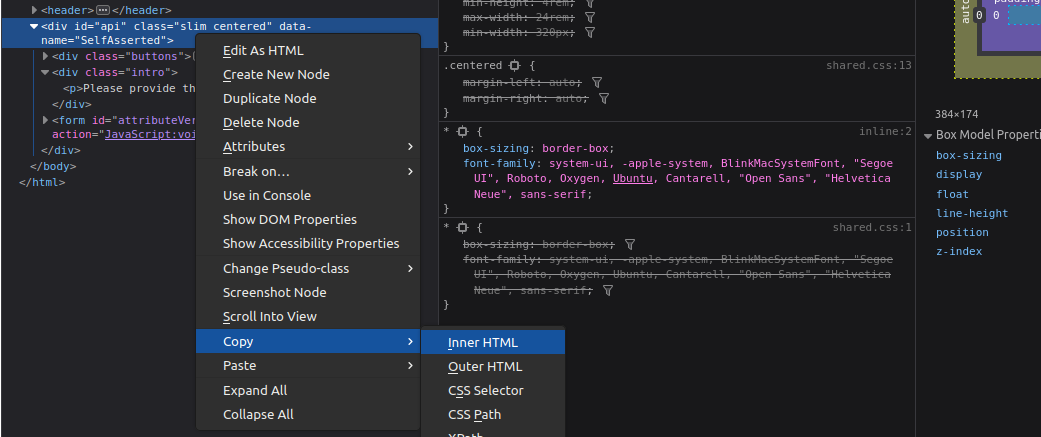
and paste it into your "signuporsignin.html` in the same position to get something close to this.
<div id="api" class="slim">
  <div
    class="claims-provider-list-buttons social"
    aria-label="Sign in with your social account"
    role="form"
  >
    <!-- omitted intentionally -->
  </div>

  <div class="divider">
    <h2>OR</h2>
  </div>

  <form
    id="localAccountForm"
    action="JavaScript:void(0);"
    class="localAccount"
    aria-label="Sign in with your email address"
  >
  <!-- omitted intentionally -->
  </form>
</div>
To navigate to verify email page, enter your email and click sign in.
Again, copy the contents of the <div id="api"> into your selfasserted.html to make it look like this.
<div id="api" class="slim">
  <div class="buttons"></div>
  <div class="intro">
    <p>Please provide the following details.</p>
  </div>
  <form id="attributeVerification" action="JavaScript:void(0);">
    <!-- omitted intentionally -->
  </form>
</div>
Now our local html pages exactly match the look of our authentication pages and we can now use the vs code live server to serve our html and update changes as we make them.
Right click the html/signinorsignup.html file from vs code's side bar and select "open with live server". This will serve and open the file in your default browser.

Customizing the login page (signuporsignin.html)
Change the text on the buttons
You can do this using JavaScript but Microsoft recommends that you do this from the policy files. Open the TrustFrameworkLocalization.xml file and find <LocalizedString> elements that have have stringId set to button_signin and FacebookExchange
Change them aas follows.
 <LocalizedResources Id="api.signuporsignin.en">
   <LocalizedStrings>
-    <LocalizedString ElementType="UxElement" StringId="button_signin">Sign in</LocalizedString>
+    <LocalizedString ElementType="UxElement" StringId="button_signin">Continue with Email</LocalizedString>
    <!-- omitted so save space -->
-   <LocalizedString ElementType="ClaimsProvider" StringId="FacebookExchange">Facebook</LocalizedString>
+    <LocalizedString ElementType="ClaimsProvider" StringId="FacebookExchange">Continue with Facebook</LocalizedString>
    <!-- omitted so save space -->
  </LocalizedStrings>
 </LocalizedResources>
Allow Javascript execution
With the current setup, our custom JavaScript will be ignored. To resolve this, let's enable it in the NoPassword.xml file.
 <RelyingParty>
  <DefaultUserJourney ReferenceId="PasswordLessLogin" />
+   <UserJourneyBehaviors>
+    <ScriptExecution>Allow</ScriptExecution>
+   </UserJourneyBehaviors>
  <!-- omitted intentionally -->
 </RelayingParty>
Save the files and upload them to your b2c tenant using the Azure portal.
Make the same changes to our local html/signuporsignin.html to match the changes we made.
<!-- omitted intentionally -->
<button
  class="accountButton firstButton claims-provider-selection"
  id="FacebookExchange"
  role="link"
  autofocus=""
>
  Continue with facebook
</button>
<!-- omitted intentionally -->
<button id="next" type="submit" form="localAccountForm">
  Continue with email
</button>
Change the order of our login options and hide headings
It's weird how the login options no longer abide to the policy when use supply a custom html template. To solve this, add this styles after the opening body tag of your html. This styles will also hide our headings both visually and to screen readers.
<body>
<style>
#api {
  display: flex;
  flex-direction: column;
}
#api > #localAccountForm {
  order: 1;
}
#api > .divider {
  order: 2;
}
#api > .claims-provider-list-buttons {
  order: 3;
}
.social .intro h2 {
  display: none;
}
.localAccount .intro h2 {
  display: none;
}
.divider h2 {
  visibility: hidden;
  height: 0;
  width: 0;
}
.divider {
  border-bottom: 1px solid #eee;
  height: 0;
  margin: 2rem 0;
}
</style>
<!-- omitted intentionally -->
</body>
Change the look of the elements
Add these at the end the shared.css file
* {
  box-sizing: border-box;
  font-family: system-ui, -apple-system, BlinkMacSystemFont, "Segoe UI", Roboto,
    Oxygen, Ubuntu, Cantarell, "Open Sans", "Helvetica Neue", sans-serif;
}

ul {
  list-style-type: none;
  list-style-position: outside;
  padding-left: 0;
  margin: 0;
}

.wide {
  max-width: 800px;
  min-width: 320px;
  width: 100%;
}

.slim {
  width: 100%;
  min-height: 4rem;
  max-width: 24rem;
  min-width: 320px;
}

.centered {
  margin-left: auto;
  margin-right: auto;
}

.text-muted {
  color: #666;
  font-size: small;
}

.text-muted a {
  color: #444;
}

figure#logo {
  margin: 1rem;
  font-size: 2rem;
}

main {
  display: flex;
  height: 80vh;
  justify-content: center;
  align-items: center;
  flex-direction: column;
}

input {
  display: block;
  width: 100%;
  padding: 16.5px 14px;
  font-size: 16px;
  border-radius: 4px;
  border: 1px solid rgba(0, 0, 0, 0.23);
  outline: 2px solid transparent;
}

input:focus,
input:active {
  border: 1px solid transparent;
  /* outline: 2px solid #007fff; */
  outline: 2px solid #000;
}

.entry-item {
  padding: 1rem 0 2rem;
  display: flex;
  flex-direction: column;
}

.entry-item label {
  order: 1;
}

.entry-item input {
  order: 2;
}

.entry-item .error {
  order: 3;
}

.entry-item .error p {
  color: crimson;
  text-transform: lowercase;
  font-size: small;
  order: 3;
  margin: 4px;
}

label {
  display: block;
  margin-bottom: 0.4rem;
  font-size: small;
}

button#next,
button#readOnlyEmail_ver_but_verify {
  background-color: black;
  color: white;
  border: 1px solid black;
}
button#next:hover,
button#readOnlyEmail_ver_but_verify:hover {
  background-color: #333;
}
button#next:active,
button#next:focus,
button#readOnlyEmail_ver_but_verify:active,
button#readOnlyEmail_ver_but_verify:focus {
  outline: 3px solid rgba(0, 0, 0, 0.23);
}

button {
  width: 100%;
  display: block;
  padding: 16.5px 14px;
  border: 1px solid transparent;
  text-transform: uppercase;
  border-radius: 4px;
  outline: none;
  cursor: pointer;
}
button:active,
button:focus {
  outline: 3px solid black;
}

button#FacebookExchange {
  background-image: url(https://participateb2c.b2clogin.com/static/tenant/templates/idp_logos/colored/facebook.svg);
  background-repeat: no-repeat;
  background-size: 28px 28px;
  background-position: top 40% left 2%;
}
Remember to readd a reference to this css file in your html
<!-- omitted intentionally -->
  <title>Acme</title>
- <link rel="stylesheet" href="https://callous-move.surge.sh/shared.css" />
+ <link rel="stylesheet" href="./shared.css" />
<!-- omitted intentionally -->
Autofocus on the email input when the page loads
Notice how the is why the "continue with facebook" button is focussed on page load.
To transfer focus to our email input, add this javascript just before the closing </body> tag.
<body>
<!-- omitted intentionally -->
<script>
  document.getElementById("email").focus();
</script>
</body>
Customize the verify email page (selfasserted.html)
We'll be changing a lot here, so i'll take longer steps and explain them briefly.
Add the following styles after the opening <body> tag
<body>
  <style>
    /* hide unwanted elements */
    input#readOnlyEmail,
    label#readOnlyEmail_label,
    .error.itemLevel,
    .helpLink.tiny,
    .intro > p,
    #readOnlyEmail_intro,
    .verificationInfoText {
      display: none !important;
    }
    /* button container */
    .buttons.verify {
      display: flex;
      flex-direction: column;
    }
    /* resend button */
    button#readOnlyEmail_ver_but_resend {
      margin-top: 0.8rem;
      font-weight: 400;
      border: none;
      background: none;
      cursor: pointer;
      order: 1;
      text-align: left;
      text-transform: none;
      padding:0;
    }
    button#readOnlyEmail_ver_but_resend > strong {
      color: rgb(32, 32, 218);
    }
    button#readOnlyEmail_ver_but_resend > strong:hover {
      color: rgb(101, 92, 223);
    }
    button#readOnlyEmail_ver_but_resend:hover {
      color: black;
    }
    /* continue button */
    #readOnlyEmail_ver_but_verify {
      order: 2;
      margin-top: 0.8rem;
    }
    button#readonlyEmail_ver_but_verify:disabled {
      background-color: #999;
      cursor: wait;
    }
    /* hide original continue button */
    #continue {
      display: none;
    }
  </style>
  <!-- ommited intentionally -->
</body>
Then add this script before the closing </body> tag
<body>
<!-- omitted intentionally -->
<script>
(() => {
sendCodeAndHideResendButton();
showVerifyInputAndButton();
replaceContinueButtonWithVerify();
attachIntroductionText();
})();
function replaceContinueButtonWithVerify() {
let verifyButton = document.getElementById(
"readOnlyEmail_ver_but_verify"
);
let continueButton = document.getElementById("continue");
verifyButton.innerText = "Continue";
verifyButton.setAttribute("style", "display: block");
continueButton.setAttribute("style", "display: none");
verifyButton.addEventListener("click", function () {
clearError();
verifyButton.innerText = "loading ...";
verifyButton.setAttribute("disabled", true);
let interval = setInterval(function () {
if (hasSuccess()) {
document.getElementById("continue").click();
clearInterval(interval);
}
if (hasError()) {
verifyButton.innerText = "continue";
verifyButton.removeAttribute("disabled");
clearInterval(interval);
}
}, 1000);
});
}
function showVerifyInputAndButton() {
let verifyInput = document.getElementById("readOnlyEmail_ver_input");
let verifyInputLabel = document.getElementById(
"readOnlyEmail_ver_input_label"
);
let verifyButton = document.getElementById(
"readOnlyEmail_ver_but_verify"
);
verifyInput.setAttribute("style", "display: block");
verifyInput.setAttribute("placeholder", "Paste the code here ...");
verifyInput.focus();
verifyInputLabel.setAttribute("style", "display: block");
verifyButton.innerText = "Continue";
verifyButton.setAttribute("style", "display: block");
}
function attachIntroductionText() {
let email = document
.getElementById("readOnlyEmail")
.getAttribute("value");
document.getElementById(
"instruction"
).innerHTML = ``;
}
function sendCodeAndHideResendButton() {
let sendButton = document.getElementById("readOnlyEmail_ver_but_send");
sendButton.setAttribute("style", "display: none;");
setTimeout(() => {
sendButton.click();
}, 0);
hideResendButton();
}
function hideResendButton() {
let resend = document.getElementById("readOnlyEmail_ver_but_resend");
hide();
let interval = setInterval(() => hide(), 1000);
setTimeout(function () {
clearInterval(interval);
show();
}, 30000);
function hide() {
resend.setAttribute("style", "visibility:hidden");
resend.innerHTML = "Didn't get the code? <strong>Resend</strong>";
}
function show() {
resend.setAttribute("style", "visibility:visible");
}
}
function hasError() {
return (
document.querySelector(".verificationErrorText[aria-hidden=false]") &&
true
);
}
function clearError() {
let withError = document.querySelector(
".verificationErrorText[aria-hidden=false]"
);
if (withError) {
withError.setAttribute("aria-hidden", true);
}
}
function hasSuccess() {
let success = document.querySelector(
".verificationSuccessText[aria-hidden=false]"
);
if (success) {
success.setAttribute("style", "display: none");
return true;
}
return false;
}
</script>
</body>
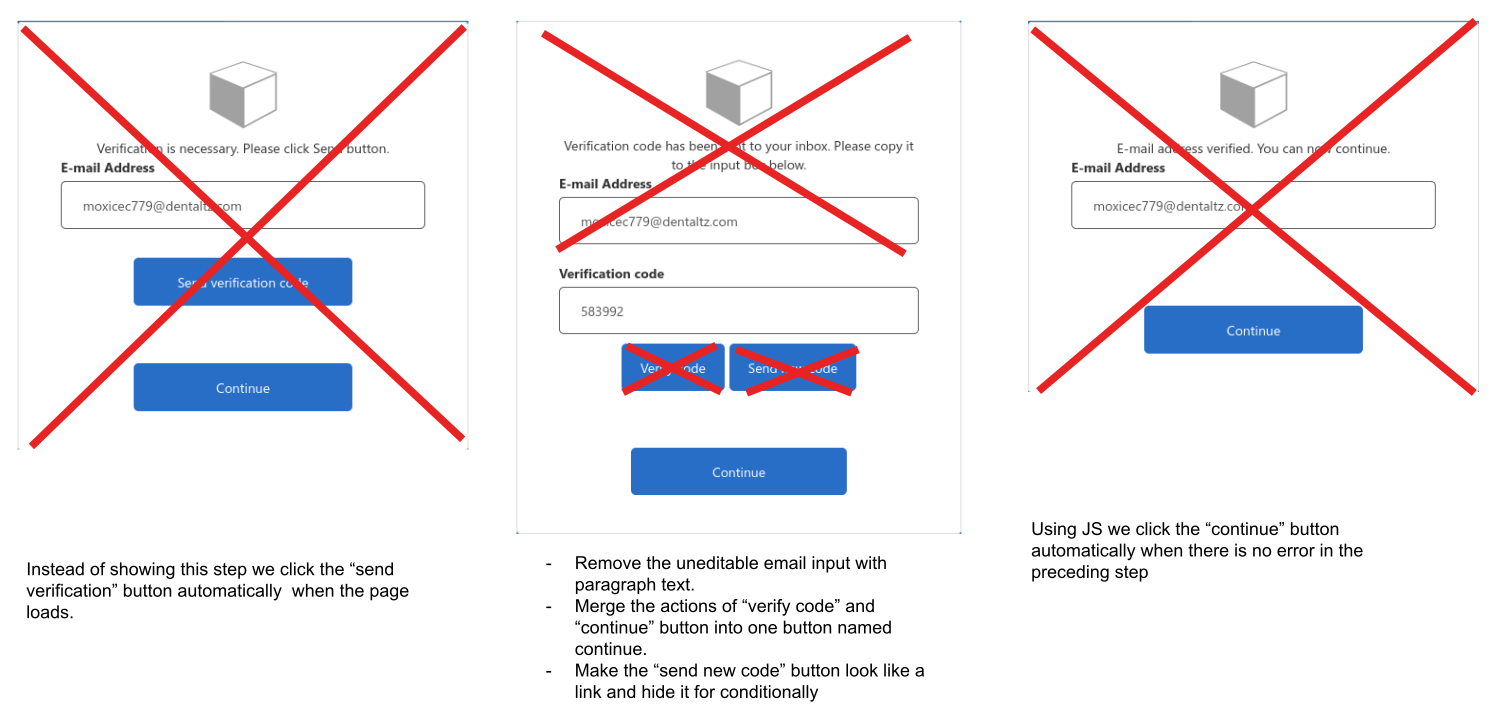
Here is what this CSS and JavaScript is doing.
Test again
Detach the your local css from html/signuporsignin.html and html/selfasserted.html
  <title>Acme</title>
+ <link rel="stylesheet" href="https://callous-move.surge.sh/shared.css" />
- <link rel="stylesheet" href="./shared.css" />
Navigate to the folder containing the html files and run surge to deploy your files.
surge
Now go the azure portal to test your new authentication pages.
Conclusion
Custom policies are not the easiest to work with but give you power to alter the experiences to meet your needs.